
Templates take away the manual entry of work item fields when you create them. Consider them as the blueprints that automatically populate fields in work items from a group of default values you set when you create a Template.
With Templates, Almo can also automatically extract the correct information from Outlook objects, add that to the work item fields automatically and thus save hours of manual work. You do this by using Expressions in Templates which then instruct Almo to extract data from Outlook objects (email, calendar meetings or tasks) and use those values to fill the work item fields.
Video Walk Through
Here is a video walk through of creating and using Templates:
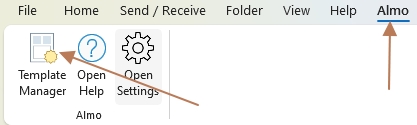
Creating Template Using Template Manager
Go to the Almo menu and open the ‘Template Manager’ at the top-left corner of your screen. Before creating a Template, Almo will prompt you to connect to a server if you have not done that yet.
In the Template Manager dialogue box, select ‘Add New Template’ to access the dropdown menu and then select a project and a work item type for which you are creating this Template. This will open the Template editor that you can use to set your Template rules.

Pro Tip: You can create multiple Templates for each work item type.
Adding details to the Template editor
The screenshot below shows how the blank template editor might appear. Since the Template Editor uses your Azure DevOps Service’s setup to render the work item form, your view of tempalte editor might appear different than the view shown here. However the basic sections in “Template Details” will be the same.
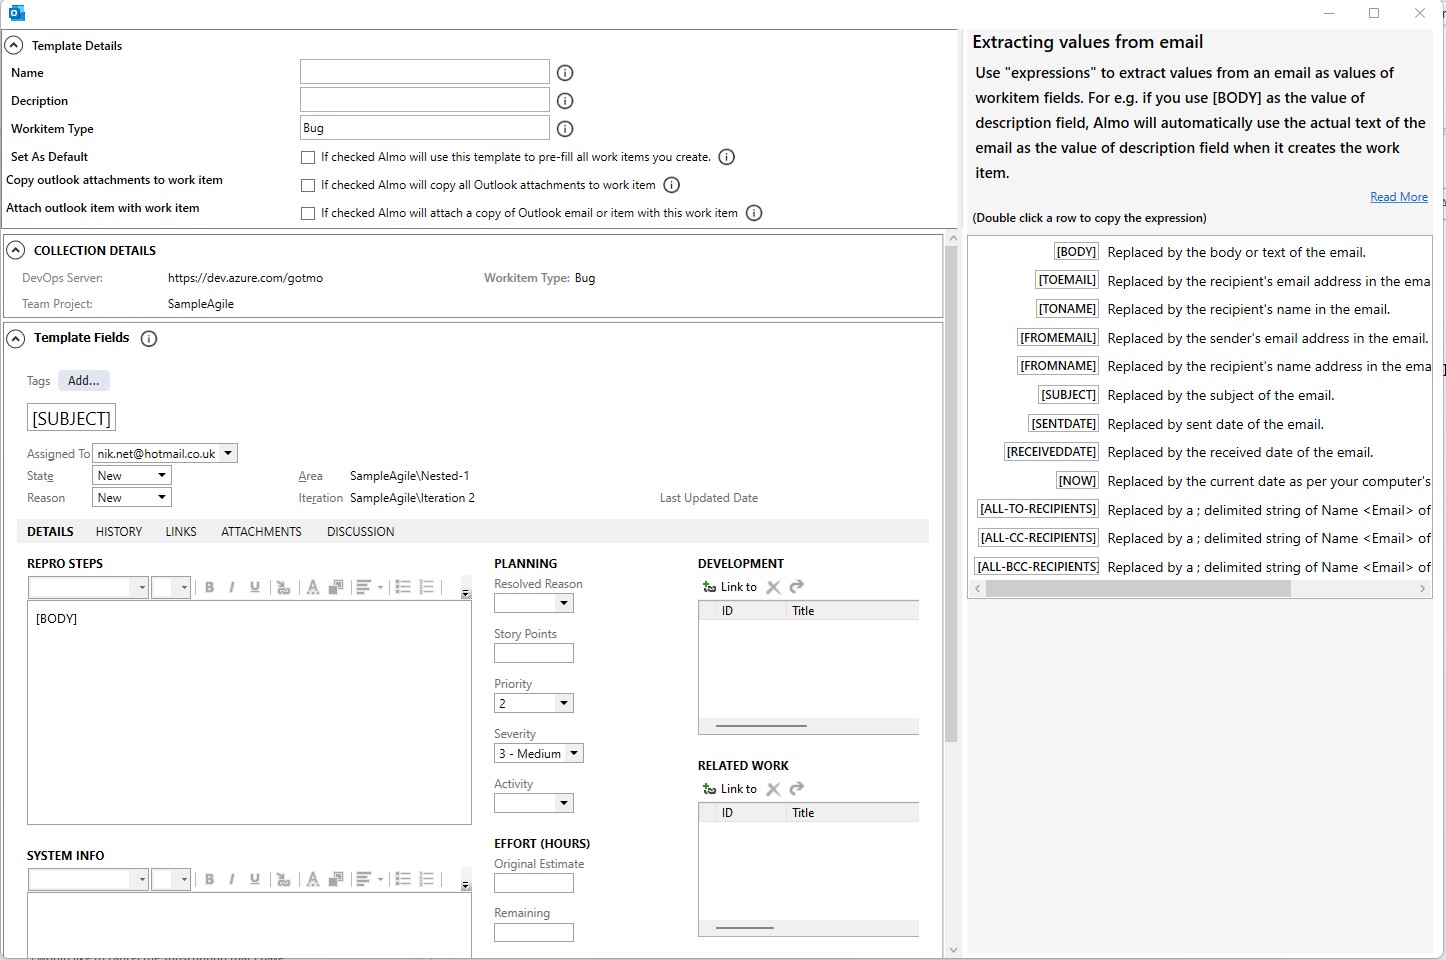
1. Template Details
Begin by adding Template details like name and description. You will also see a few checkboxes with different functions in the editor. Select one or more per your preference. Here is what they do:
Checkbox 1: Set As Default — Almo will automatically use these Template details whenever you create the specified work item type.
Checkbox 2: Copy Outlook attachments to work item — Almo will take any attachments that are present in the Outlook email and attach them to the work item when it is created
Checkbox 3: Attach Outlook item with work item — Almo will automatically attach a copy of your Outlook email with the work item when it is created.
2. Expressions
Use Expressions to take various properties of an Outlook object like email, calendar or task to populate multiple fields in the work items. These properties could be email subjects, time stamps, receivers’ addresses and more.
| Expressions | Description |
|---|---|
| [TOEMAIL] | Almo will replace this with recipient’s email address in the Outlook email. |
| [TONAME] | Almo will replace this with recipient’s name in the Outlook email. |
| [BODY] | Almo will replace this with the body or text of the Outlook email. |
| [FROMEMAIL] | Almo will replace this with sender’s email address in the Outlook email. |
| [FROMNAME] | Almo will replace this with sender’s name in the Outlook email. |
| [SUBJECT] | Almo will replace this with the subject of the Outlook email. |
| [SENTDATE] | Almo will replace this with the sent date of the Outlook email. |
| [NOW] | Almo will replace this with the current date as per your computer’s calendar. |
| [RECEIVEDDATE] | Almo will replace this with the received date of the Outlook email. |
Select an Expression from the list and assign one or more fields in the Template (further explained in the next step).
3. Template Fields
The fields in the template are rendered as they would appear in the work item on Azure DevOps Service. Almo will paint this section as per the setup of your work item type and thus it might look different than the generic screenshot below.
Use this section to add further details to the Template you want to create. For example, use the ‘Subject’ box for the title of the work item. You can also select an Expression to populate the fields, such as the [Subject] of the email. For this, double-click the Expression and paste it into one of the Template fields.
Once you have set all the rules for the work item type, scroll down and click ‘Save.’
Creating Template While Creating Work Items
One of the easiest and quickest ways of creating a Template is while creating a new work item. First, follow the usual steps for creating a new work item:
Click the ‘New or Find’ option in the Almo toolbar > select the work item type
To save Template rules, instead of clicking ‘Save,’ click ‘Save As Template.’ This will open the Template editor where you can fill in additional details and save this Template.
More on Almo Templates
Setting a Template as Default
For convenience, you can set a Template as default. This will instruct Almo to automatically use the default Template to pre-fill the values every time you create a new work item of that type.
Filter Templates
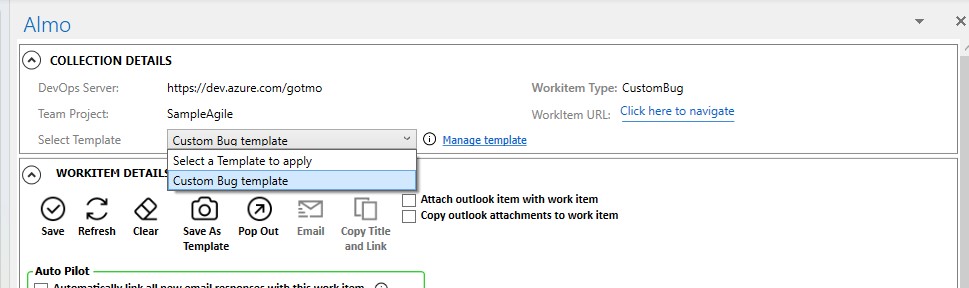
If you have more than one Template for a work item type, use the ‘Select Template’ option to filter the Templates.
Managing Templates
Use the Template Manager to manage your Templates, including adding new Templates, setting an existing Template as the Default Template and deleting Templates.
You can access the Template Manager from the Almo toolbar.

