Efficient Work Item Management with Azure DevOps: A Comprehensive Guide

Effective work item management is crucial for any software development project. Azure DevOps Service, a powerful suite of tools provided by Microsoft, offers a robust solution for managing work items throughout the development lifecycle. In this blog post, we will explore the key features of Azure DevOps and provide practical tips for optimizing work item management. From creating and tracking work items to leveraging automation and collaboration, this guide will help you streamline your development process and enhance productivity. Let’s dive in!

Section 1: Understanding Azure DevOps

Azure DevOps is a cloud-based platform that provides end-to-end software development tools, enabling teams to plan, develop, test, and deliver software efficiently. Its work item management capabilities are centred around three key elements: work items, boards, and backlogs.

# Work items: Work items represent tasks, issues, or requirements within a project. They can be customized to suit your team’s needs, with various types such as user stories, bugs, tasks, and more.

# Boards: Boards in Azure DevOps offer a visual representation of work items. You can create customizable Kanban boards, Scrum boards, or task boards to track the progress of work items and gain visibility into the development process.

# Backlogs: Backlogs provide a prioritized list of work items that need to be completed. They serve as a central repository for capturing and managing requirements, allowing teams to plan their work and schedule iterations effectively.

Section 2: Creating and Tracking Work Items

To effectively manage work items with Azure DevOps, follow these best practices:

# Clear item descriptions: Ensure work items have concise and descriptive titles and descriptions. This helps team members understand the task at hand and prevents ambiguity.

# Categorization: Use appropriate tags, areas, and iterations to categorize work items. This enables easier searching, filtering, and reporting, making it simpler to find and prioritize tasks.

# Establish relationships: Utilize parent-child relationships between work items to represent dependencies or hierarchies. This enables tracking progress at both micro and macro levels, enhancing transparency.

# Assigning and tracking progress: Assign work items to team members and set appropriate effort estimates. Regularly update the status and progress of work items to keep everyone informed and identify potential bottlenecks.

Section 3: Automation and Collaboration

Azure DevOps offers several automation and collaboration features that can streamline work item management:

# Automated workflows: Utilize Azure Pipelines to automate the creation and tracking of work items. For example, you can configure triggers to automatically create a bug work item when a test case fails.

# Integrations: Leverage integrations with popular development tools such as Visual Studio, GitHub, and Jenkins. These integrations allow seamless synchronization of work items, enabling teams to work in their preferred environments.

# Notifications: Configure notifications to keep team members informed about changes to work items. Azure DevOps provides flexible notification settings, allowing users to receive updates via email, Teams, or other channels.

# Real-time collaboration: Azure DevOps supports real-time collaboration, enabling team members to discuss and resolve issues directly within work items. This promotes effective communication and reduces delays caused by back-and-forth conversations.

Section 4: Reporting and Analytics

Azure DevOps provides powerful reporting and analytics capabilities to track project progress and identify areas for improvement:

# Dashboards: Create customized dashboards to display key metrics and charts related to work item management. This allows stakeholders to visualize the progress of work items and make data-driven decisions.

# Query and charting tools: Use Azure DevOps query and charting tools to slice and dice data, analyze trends, and identify bottlenecks or areas requiring attention.

# Burndown charts: Burndown charts provide a visual representation of the work remaining versus time, allowing teams to track progress and adjust their plans accordingly.

Conclusion

Efficient work item management is vital for successful software development projects. With Azure DevOps, you have a powerful suite of tools at your disposal to streamline work item creation, tracking, automation, collaboration, and reporting. By following the best practices outlined in this guide, you can enhance productivity, foster effective collaboration, and deliver high-quality software on time. Start leveraging Azure DevOps with Almo and take your work item management to the next level. Happy coding!

Troubleshoot: Error Message When Launching Almo

Almo’s Background Server

Almo’s CPU and memory-intensive tasks are run by an out-of-process server process that communicates via Almo’s Outlook Client using named pipes on a user’s machine. Almo client periodically interacts with the server to either do Azure DevOps-related operations or for features such as Auto Pilot. When the server is running it will be listed in Windows Task Manager as shown below:

Image of Almo server in Windows Task Manager
Almo server in Windows Task Manager

Potential Issues

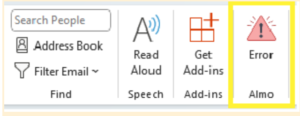
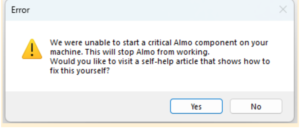
However, network or machine administrators may have policies that prevent stand-alone executables from running in the background. Should this happen, Almo’s Outlook client will cease to function and display this warning in the Ribbon and as a user-interactable message.

Almo's Server can fail to launch
Warning message on launching Almo.
Warning sign in Almo ribbon
Warning sign in the Almo ribbon

Almo’s Outlook client is designed to detect the server’s runtime status and attempt to run it if it detects that the server is not running. 

The Almo client refers to registry settings in a specific parent node to identify the location of the server and initiate its execution.

Resolution

You can use these steps to ensure that the right registry settings are in place for Almo’s Outlook Client to launch the server or failing that, launch it manually.

Step 1: Locate the Almo Server

Follow these steps to locate the Almo server on your machine:

– Open File Explorer

– In the address bar, type or copy-paste the following path: “C:\Program Files (x86)\vi8\server\almo\”

– Look for a file named “Vi8.Ipc.Server.Almo.exe” in that location

– Ensure that the server is present in the specified location and that you have the rights to access and launch the exe. It is OK to double click and launch it manually at this stage.

Step 2: Confirm Registry Settings

We need to verify the registry settings to ensure that Almo can detect and run the server. Here’s how you can do it:

– Press the Windows key + R to open the Run dialogue box

– Type “regedit” and press Enter. This will open the Registry Editor

– In the Registry Editor, navigate to the following path: Computer\HKEY_LOCAL_MACHINE\SOFTWARE\WOW6432Node\vi8\Server\Almo

– Confirm that the registry settings in this location match the two data points mentioned below:

            – Key with the name “InstallDir” should have a string value of C:\Program Files (x86)\vi8\server\almo\

            – Key with the name “Name” should have a string value of Vi8.Ipc.Server.Almo.exe

You can also download the registry settings here. Please rename the file to “.reg” and use Window’s registry editor to import them into your registry. Restart Outlook and you should be good to go.

It’s important to bear in mind that Outlook will be running under your user context and Almo’s Outlook client would be running under Outlook as a process. Both Outlook and Almo must be allowed to programmatically read the registry settings so that they can launch the server as needed.

Step 3: Run the Almo Server Manually

If the Almo server is not running or if it was blocked by your network or machine administrators, you can manually start it by following these steps:

– Go to the location C:\Program Files (x86)\vi8\server\almo\ in File Explorer

– Locate the “Vi8.Ipc.Server.Almo.exe” file

– Double-click the “Vi8.Ipc.Server.Almo.exe” file to run the server

Conclusion

By following these steps, you can troubleshoot and resolve the “Unable to Start Critical Almo Component” error in Almo. Ensure that the Almo server is present in the specified location, confirm the registry settings and manually start the server, if needed. These steps should help you get Almo back to its normal function and improve your productivity with its features.

If you have any questions or need additional help, please, don’t hesitate to contact us. We are happy to assist you.

Refresh Your Almo For Outlook License

Almo for Outlook periodically refreshes your license from our servers. This process is non-deterministic to a large extent and happens transparently in the background. However, you might want to force a refresh of the license yourself in some cases.

Should this be the case, please follow these steps:

1. Go to the Almo toolbar in Outlook and click on ‘Open Help.’

“Open Help” option in TMO/Almo toolbar in Outlook.

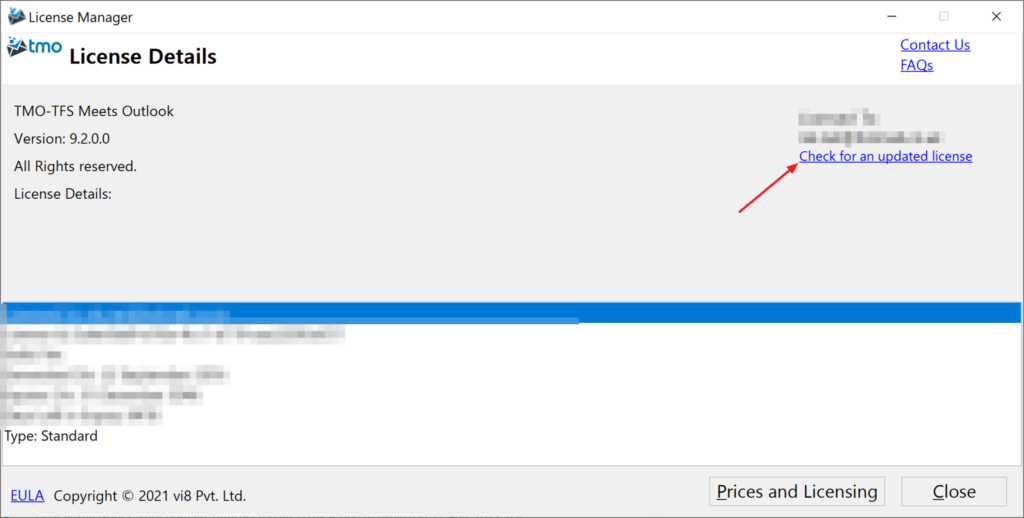
2. The License Details screen will open. Click on “Check for an updated license” to fetch your latest license from our servers.

'Check for an updated license' in TMO/Almo Open Help screen
‘Check for an updated license’ in TMO/Almo Open Help screen

Do write to us if you need further questions. We are happy to help!

Fixing Patterns for Async MVVM Applications

NullReferenceException

Download the code here –AsyncCommands

If you like this post you might also like an interesting post on Deadlocks while using tasks.

This post is a follow up on Stephen Cleary’s excellent post on MSDN here which is a series of articles he wrote to explain how Tasks based patterns can be effectively adopted for GUI/MVVM applications. The article is great and the attached source code works but there is one problem with the provided source code. To experience this issue open up the provided solution and within any project find the “Service.cs” class. Then comment the following statement

Figure 1
  1. //await Task.Delay(TimeSpan.FromSeconds(3), token).ConfigureAwait(false);

Run the project now and enter an invalid URL such as dhttp://msdn.microsoft.com.

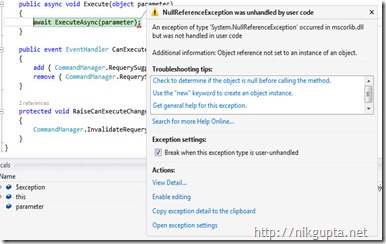
You would notice that the application throws a nasty “NullReferenceException was unhandled by user code” exception and dies.

Reason

The reason for this behaviour is the way NotifyTaskCompletion class’ monitoring logic works. Essentially we pass a Task to the NotifyTaskCompletion class which then monitors the passed task and reports on its status. If however the Task that we are passing to the class is already completed or has errored this class would not be able to watch it or contain the Task’s exception. This is actually what happens here. When we write a statement such as this

Figure 2
  1. Execution = newNotifyTaskCompletion<TResult>(_command());


where _command is declared as

Figure 3
  1. privatereadonlyFunc<Task<TResult>> _command;

we are essentially passing a running Task to the NotifyTaskCompletion class.

When we modify the URL to be an empty URL and remove the Task.Delay statement from the Service class the Task immediately throws an exception. This does not give NotifyTaskCompletion the chance to monitor and await on the Task to catch the thrown exception.

If however we did not comment out the statement in Figure 1 the Task goes into a small delay which gives the NotifyTaskCompletion class the chance it needs to await on the Task and thus catch the exception.

Solution

The easiest way to fix this is to not pass a Task to the NotifyTaskCompletion class but pass a Func<Task<TResult>>. This would allow NotifyTaskCompletion class to ensure that the Task does not start running before the class has a chance to monitor the Task. Please note I am not stating that the class will be able to control when the Task runs (as the .NET framework would do that) but instead it can ensure that the Task does not run until at least the NotifyTaskCompletion is ready to await on it.

So with the changes this is how the NotifyTaskCompletion class will look.

Figure 4
  1. publicsealedclassNotifyTaskCompletion<TResult> : INotifyPropertyChanged
  2. {
  3.     publicTask<TResult> Task { get; privateset; }
  4.     public NotifyTaskCompletion(Func<Task<TResult>> task)
  5.     {
  6.         if (Task == null)
  7.         {
  8.             TaskCompletion = WatchTask(task);
  9.         }
  10.     }
  11.     publicTask TaskCompletion { get; set; }

You will notice that most of the code here remains unchanged. To call into the class as opposed to the statement in Figure 2 you would do this

Figure 5
  1. Execution = newNotifyTaskCompletion<TResult>(_command);


I have attached the modified code with this article. You can download it AsyncCommands. The bulk of the changes are in the NotifyTaskCompletion class with the AsyncCommand class modified slightly as shown in Figure 5 to pass the Func<Task<TResult>> to NotifyTaskCompletion as opposed to Task itself.

Would love to hear your thoughts so please do leave a comment here!

Deadlocks when using Tasks – solved

In my last post Deadlocks when using Tasks I explained how this innocent looking piece of code can cause a GUI app to deadlock and die. I proceeded to explain the reasons behind this behaviour. In this post I aim to discuss one possible solution to this problem and highlight some potential design considerations that you should be aware of while working with TAP code that uses asynchronous calls mixed with synchronous wait calls. For convenience this is the piece of code that would deadlock your application

public static class NiksMessedUpCode
    {
        private static async Task DelayAsync()
        {
            await Task.Delay(1000);
        }
 
        public static void Test()
        {
            // Start the delay.
            var delayTask = DelayAsync();
            // Wait for the delay to complete.
            delayTask.Wait();
        }
    }


Solution

Modifying the code as shown below will remove the deadlock. Can you spot what we did here?

public static class NiksMessedUpCode
{
    private static async Task DelayAsync()
    {
        await Task.Delay(1000).ConfigureAwait(false);
    }
 
 
    public static void Test()
    {
        // Start the delay.
        var delayTask = DelayAsync();
        // Wait for the delay to complete.
        delayTask.Wait();
    }
}


Yes we added a ConfigureAwait(false) to the Delay method call on our Task. Go on try this code in the GUI app. This should not deadlock anymore.

Explanation

As you are aware when a Task execution is started .NET runtime effectively captures the existing context under which the application was currently running and immediately returns. Once the awaited Task has finished its execution the .NET runtime would execute the remainder of the async method on the same context that it captured before the Task was awaited. In a VERY simplistic manner you can imagine something like this (borrowed from Stephen Toub’s article on MSDN here). Logically you can think of the following code:

await FooAsync();
RestOfMethod();

as being similar in nature to this:

var t = FooAsync();
var currentContext = SynchronizationContext.Current;
t.ContinueWith(delegate
{
    if (currentContext == null)
        RestOfMethod();
    else
        currentContext.Post(delegate { RestOfMethod(); }, null);
}, TaskScheduler.Current);

This logical execution however changes when ConfigureAwait is added to the mix.

Using ConfigureAwait(false) actually instructs the .NET runtime to not bother with capturing the context before the await statement and hence execute the remainder of the method execution post await statement on any thread pool context.

As I mentioned in my previous article the cause of the deadlock was that there is no way for the await call in the DelayAsync method to signal its completion as the delayTask.Wait() statement is blocking up the SynchronizationContext from running any other chunk of code. This then becomes the cause of the deadlock. You can read the whole explanation here

Using ConfigureAwait however enables the await to execute the remainder of the code in DelayAsync method on a thread pool context and thus gets us around the deadlock. The main SynchronizationContext which was waiting on the delayTask.Wait() statement gets to know about the completion of the await call and hence can execute the rest of the code.

Caution with ConfigureAwait

The fact that using ConfigureAwait signals the await mechanism to run the remainder of the method on any thread pool context and not necessarily on the original context which was used to run the code before the await system has an important implication.

Given that using ConfigureAwait causes an effective loss of the original context you should not use ConfigureAwait within any code block that directly manipulates GUI elements.

For instance following is an example where you cannot use ConfigureAwait

private async void Button_Click(object sender, RoutedEventArgs e)
        {
            try
            {
                button1.IsEnabled = false;
                //CANT USE CONFIGUREAWAIT HERE!!!!
                await SomeTask();
                
            }
            catch (Exception ex)
            {
                MessageBox.Show(ex.Message);
                //do somethingwith the exception here
            }
            finally
            {
               /// When the await is over this line of code will have to be run on the original thread that created the button element
               /// thus we cannot use configureawait in the preceeding await.
                
                button1.IsEnabled = true;
            }
        }

        private async Task SomeTask()
        {
            await Task.Delay(3000);
            
        }

If you were to try and use ConfigureAwait in the button click handler you will see an exception being raised. Go on try using the above code.

You can however use ConfigureAwait in the SomeTask method as shown below and in fact I would recommend you do this

      private async void Button_Click(object sender, RoutedEventArgs e)
        {
            try
            {
                button1.IsEnabled = false;
                //CANT USE CONFIGUREAWAIT HERE!!!!
                await SomeTask();

            }
            catch (Exception ex)
            {
                MessageBox.Show(ex.Message);
                //do somethingwith the exception here
            }
            finally
            {
                /// When the await is over this line of code will have to be run on the original thread that created the button element
                /// thus we cannot use configureawait in the preceeding await.

                button1.IsEnabled = true;
            }
        }

        private async Task SomeTask()
        {
            // Yup can use ConfigureAWait here even though the button handler calls this. Why? Read my blog!!
            await Task.Delay(3000).ConfigureAwait(false);

        }

Remember each async method has its own context! Thus when we call into the method SomeTask it starts with its own context which is different from the main SynchronizationContext that was running the button click handler. It is then perfectly valid to use ConfigureAwait in this method as when this code runs (and await returns) the .NET runtime would take care to marshal back the remainder of the button click handler on the original SynchronizationContext (and hence the correct thread) completely independently of where it ran the rest of the SomeTask method post its await statement.

A natural deduction of the above discussion is the recommendation that you use as minimum code as possible within the actual button click event handler and write the bulk of the code in other async method which you call from the actual click handler. This would free up the main GUI thread of your app to only handle the important GUI related messages while running the other async methods on different contexts thus bringing in an element of parallelism in your code and improving performance further.

Summary

As a conclusion I would recommend creating an effective barrier in your code between code that runs on or manipulates GUI elements and the rest of the code and have the rest of the GUI free code embrace COnfigureAwait to free up main GUI thread even further. For ASP.NET applications the context sensitive code would be any method block that works with HttpContext.Current, builds up HttpResponse or returns from controller methods.

Final thoughts and a small teaser!

Actually thinking more on this there are further subtle nuances on how the await mechanism captures contexts. You might be surprised if I state that there are legit cases when .NET runtime would not capture context at all before an await statement even if you do not use ConfigureAwait within that await statement block. That however is a topic for another post if there is an appetite for that. Let me know!


Deadlocks when using Tasks

TPLWhat is wrong with this code?

 public static class NiksMessedUpCode
    {
        private static async Task DelayAsync()
        {
            await Task.Delay(1000);
        }

        public static void Test()
        {
            // Start the delay.
            var delayTask = DelayAsync();
            // Wait for the delay to complete.
            delayTask.Wait();
        }
    }


The code compiles without errors yet there is something really terrible about this small piece of code that can effectively kill your application if you are not careful.

Can you spot what it is?

Basically when used in an ASP.NET or a GUI app (Windows Forms, WPF) this code will cause a deadlock. The application would stall and become completely unresponsive if this very small piece of innocent looking code is executed within the app. Surprisingly though the same code will work inside a console application! Go on give it a go!

So what mysterious dark forces are at play here?

The answer is the subtle differences in “context”. Basically when an incomplete Task is awaited the current “context” is captured and is used to run the remainder of the code once the Task completes. Thus in my example above this line

 await Task.Delay(1000);

causes the current context to be captured which is then used later on (after 1000 milliseconds here) to run the rest of the code which in this case is a simple return from the method. This “context” by default is the current SynchronizationContext  unless it is null in which case it is the current TaskScheduler.

GUI Apps

In the case of GUI and ASP.NET Applications the default SynchornizationContext permits only one chunk of code to run at a time. So if you think of this SynchronizationContext as a single pipe which will process all the instructions this is what happens.

1. This statement

delayTask.Wait();

causes the SynchornizationContext to wait for the Task in DelayAsync method to complete before any other code can execute.

2. Before the Task in DelayAsync method runs the SynchronizationContext is captured.

3. The Task in DelayAsync runs and effectively waits for 1000 milliseconds.

4. After 1000 milliseconds when the Task completes the await system tries to execute the remainder of the DelayAsync code on the captured SynchornizationContext. However this context is now already running that line of code (step 1.) which is waiting for the Task to complete. Thus await now has no way to run the remainder of DelayAsync method as the SynchornizationContext is waiting for the Task to complete and hence we have a deadlock!

So why not Console Apps?

Console applications believe it or not have a thread pool SynchornizationContext instead of “one piece of code at a time” SynchornizationContext. Thus in the case of a console app when the await completes it can schedule the remainder of the async (DelayAsync) method on a thread pool thread! Thus the DelayAsync method is able to complete which completes the Task and hence there is no deadlock.

 Finally – Async all the way

It is worth noting that this problem would perhaps never arise if the person writing the code followed this simple advice.

Do not mix Async code with Synchronous code. When using TPL Async programming techniques make sure you go Async all the way.

delayTask.Wait() is a synchronous blocking call whereas Task.Delay is not. Mixing and matching these two in the same execution context can lead to subtle yet potent problems.

This is especially true for applications which were written as synchronous applications but then slowly and gradually converted to adopt asynchronous programming techniques. In these applications as asynchronous code is introduced there are many potential places where situations like this can develop. Thus as you start replacing your synchronous code by asynchronous code ensure that you adopt the adage of “async all the way!”.

Using Azure Blob Storage via PowerShell

Over the past week or so I have been trying to teach myself the basics of Azure. At first I was completely overwhelmed by the absolute wealth of offering that Azure has. It is a serious contender, an underdog if you will in the world dominated by the likes of AWS etc. Having had an opportunity to play around with AWS a bit in the past I was pleasantly surprised at the ease with which the whole Azure portal and offering just “flows” into your usage patterns. Obviously the wealth of information that Microsoft has made available helped in understanding Azure for what it is.

So I got my Azure account, spun up a few VMs and generally nosed around until I decided to play with Storage and particularly Blob Storage. And that was the moment when my whole smooth Azure experience came crashing down on my head in a cacophony of screeching, jarring, scratching, smashing, breaking noises!

This is how I thought my blob experience would go

[youtube=http://www.youtube.com/watch?v=wRLOPYf8NMQ&loop=1&rel=0&height=100]

Whereas in reality it was more of a

[youtube=http://www.youtube.com/watch?v=f4VRvERcbYE&loop=1&rel=0&start=26]

It is one thing to not natively support content manipulation via the Azure management portal for Blobs Microsoft but to not provide any native means whatsoever outside of code? I mean come on, seriously!?

Jim O’Neil you star you

I particularly found Jim O’ Neil’s bite size videos on Azure to be absolutely brilliant. I grew a fan of how he explains the fundamentals of every bit of Azure in about 15 minutes or so and how he manages to capture the essence of each topic that he picks. I would definitely recommend checking them out. Here is the link for the blob video, you can find all the other links at this same address http://channel9.msdn.com/Blogs/DevRadio/Microsoft-DevRadio-Part-2-Practical-Azure-with-Jim-ONeil–What-to-do-with-Blobs

What is a blob again?

For the uninitiated – a blob (which lives in a container which again lives in a storage account) is in its very essence a simple key value pair which eventually has a HTTP end point. Think of it as a way to store “stuff” i.e. files, byte content etc. in the Azure storage cloud which is identified by a unique key. And as you have guessed so far by my rant Microsoft does not provide a native way within the Azure portal to upload files (or in other words create blobs) in your storage containers. You can use freeware such as CloudBerry or write .NET code using the Azure SDK or use PowerShell to do that but there is no native way to do this within Azure portal itself.

I decided to use PowerShell to store some “stuff” in blob and quickly realized that it is an absolute pain in the proverbial to get started with PowerShell and Blob storage. I kept encountering this error

Can not find your azure storage credential. Please set current storage account using
“Set-AzureSubscription” or set the “AZURE_STORAGE_CONNECTION_STRING” environment variable.

So I wanted to pen down a quick “Dummy’s guide to PowerShell and Blobs in Azure” here to save some of my fellow technologists from scratching their eyes out in frustration.

Here is a step by step on how to create a blob in a container in a storage account in Azure using PowerShell

Dummy’s Guide to Blobs, Azure and PowerShell

1. Start by following this link to install and configure Azure PowerShell cmdlets.
2. Once you have imported your Azure subscription (which really is a X509 certificate) log onto your Azure portal and create a Storage Account and a Container. For the sake of this example we will assume a storage account called “FunkyStorage” and a container called “FunkyContainer”. You will find this link helpful. Feel free to ignore all C# related bits in the article.

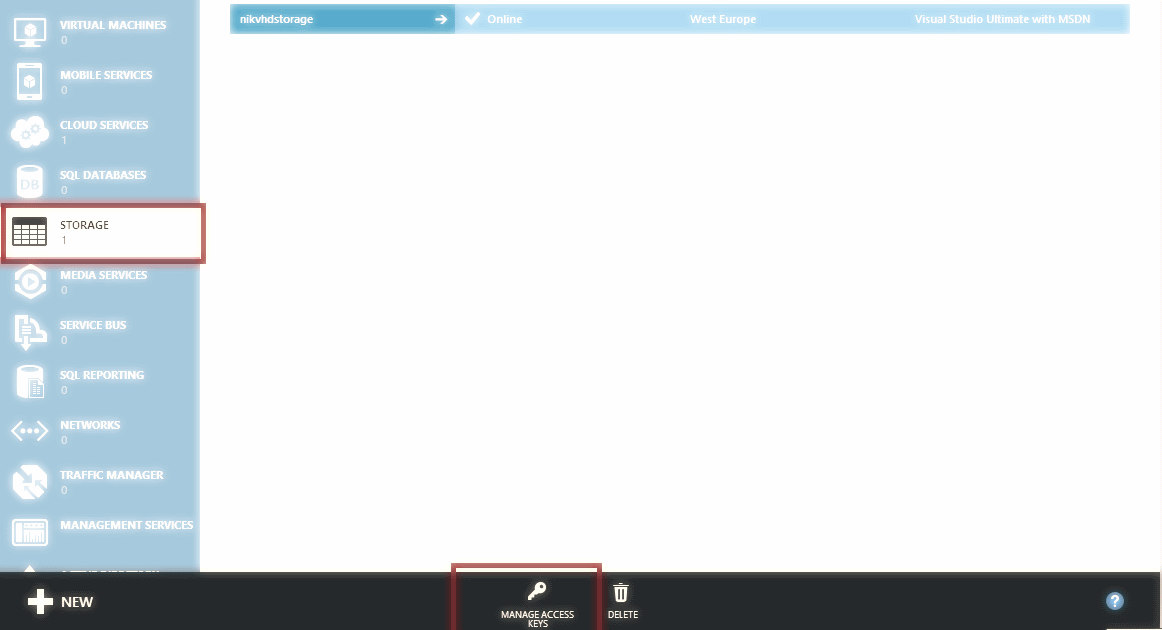
3. Log onto your Azure portal and get the Access Key from your Storage account. The following screenshot shows you how to do this.

Azure Access Keys

On clicking the link highlighted you shall get two storage keys. Select anyone that you like.
4. Now that we have the environment all setup and have obtained the access key for this storage account it is time to use PowerShell to move a file into your storage account and create a blob. Fire up PowerShell and run this command to ensure your Azure subscription is all setup.

Get-AzureSubscription

You should see the details of your subscription come up within the PowerShell console. If you don’t see the details please verify you have imported the publishsettings file correctly. If you still can’t make it work drop me a line here in the comments section and I will do my best to help.

Assuming you can see your Azure subscription details fire these two commands one after the other which would move a file called 1.txt from your temp director in the C drive into your container within Azure and create a blob called “MyFunkyBlob”.

$context = New-AzureStorageContext -StorageAccountName FunkyStorage -StorageAccountKey {Enter your storage account key here}

Set-AzureStorageBlobContent -Blob “MyFunkyBlob” -Container FunkyContainer-File “c:temp1.txt” -Context $context -Force

That’s it! This should now give you a blob called MyFunkyBlob and store the 1.txt file in it. Once you understand the basics I would definitely recommend using something like CloudBerry to easily move files back and forth between your Azure storage and local machine instead of hacking around with PowerShell.

Questions, comments? Let me know! Thanks for reading!

Compiling TFS 2010 Build Activities on VS 2012 Build Server

Background

One of the applications that I manage is a rather complex TFS 2010 beast of a build workflow that is used across the organisation to provide auditable and golden reproducible builds for the teams in the bank. Basically as per the compliance policies that all financial institutions must adhere to the applications that are produced by the back have a regulatory obligation to adhere to strict policies with regards to their source code and release management process. Most big financial institutions thus have centralized automated build systems that ensure all appropriate audit, governance and compliance regulations are adhered to by all the source code that passes through the build system.

Application

So this application then is effectively a central build system which we have designed as a customization of TFS 2010 build system  used by a good number of .NET teams within the firm. One of the components of this application is a heavily customized build workflow that ensures all compliance, governance, auditing activities for the builds.

As is expected we have a library of custom activities written which are used within the build workflow. These activities use all standard Microsoft TFS libraries such as Microsoft.TeamFoundation.Build etc. Everything in the entire application is designed to work with TFS 2010 build system.

Problem

Recently we updated one of our test build servers to have both Visual Studio 2010 and Visual Studio 2012 on it. To our extreme frustration we found that suddenly we were unable to compile our application on this build server. Bear in mind we were not upgrading the application to support TFS 2012 build system but were simply trying to compile an application that referenes v10.0.0.0 of Microsoft.TeamFoundation* libraries on a build server that has both Visual Studio 2010 and 2012 installed on it.

The error message we kept getting was

c:Program Files (x86)Microsoft Visual Studio 11.0Common7IDEReferenceAssembliesv2.0Microsoft.TeamFoundation.Client.dll: Assembly ‘Microsoft.TeamFoundation.Client, Version=11.0.0.0, Culture=neutral, PublicKeyToken=b03f5f7f11d50a3a’ uses ‘Microsoft.TeamFoundation.Common, Version=11.0.0.0, Culture=neutral, PublicKeyToken=b03f5f7f11d50a3a’ which has a higher version than referenced assembly ‘Microsoft.TeamFoundation.Common, Version=10.0.0.0, Culture=neutral, PublicKeyToken=b03f5f7f11d50a3a’


Version Error

Troubleshooting

Almost all the links that I could find on the web were aimed at helping to migrate a TFS 2010 build workflow for TFS 2012 build system. The other category involved simply getting a build workflow to compile on a VS 2012 enabled build system. While the problems were similar they weren’t exactly the same since we were not dealing with a build failure due to compilation of our build WF but because of custom activities library.

Further we were not upgrading our application to support TFS 2010.This was a crucial distinction in our case as we needed to ensure that our application can support build servers that only have v10.00* of various assemblies. We needed to ensure our build chain refers to v10.0.* of TFS assemblies and not the new v11.0* ones.

It simply didn’t make sense at that time. Why when our code projects are told to reference v10.0* of a library would they suddenly start referencing v11.0* of an assembly on the build server? Is there a binding redirect that comes with installing VS 2012? Is there a publisher policy that is put in place by MS? Is my entire application and code jinxed and do I need to draw a pentacle at the back of a cemetry and sacrifice a chicken on full moon night? WTF is going on!

For 2 straight days I spent every waking moment debugging, tracing, hooking, probing, profiling, monitoring MSBuild pipeline, the various target files and any such file that might contain a re-direction policy that could be impacting this. To my dismay I found absolutely nothing.

I even asked this question on SO where Nick suggested removing the explicit versioning information from within the code project. While potentially this could have worked (and in our case it did not) this is not what we wanted to achieve. We wanted to absolutely make sure and certain that the build process is referencing v10.0* of libraries and not the recent versions.

Resolution

The OMFG! moment came in whene I stopped caring about this problem, moved on and by chance when I was  eye-balling an article on the task “ResolveAssemblyReference” on MSDN for another piece of work. I am a bit of an SME on MSBuild and customizing its pipeline so it came as a bit of a shock and embarrassment on how did we miss this simple fact! Here is the article and this is the magic text.


SpecificVersion: Boolean value. If true, then the exact name specified in the Include attribute must match. If false, then any assembly with the same simple name will work. If SpecificVersion is not specified, then the task examines the value in the Include attribute of the item. If the attribute is a simple name, it behaves as if SpecificVersion was false. If the attribute is a strong name, it behaves as if SpecificVersion was true.
When used with a Reference item type, the Include attribute needs to be the full fusion name of the assembly to be resolved. The assembly is only resolved if fusion exactly matches the Include attribute.
When a project targets a .NET Framework version and references an assembly compiled for a higher .NET Framework version, the reference resolves only if it has SpecificVersion set to true.
When a project targets a profile and references an assembly that is not in the profile, the reference resolves only if it has SpecificVersion set to true.

This is it! It is the bloody default behaviour of MSBuild! Once this clicked in my head it was rather easy to confirm. I simply edited my build definition and passed in parameter /v:d to MSBuild call which basically tells MSBuild to produce a rather extensive log of what it is upto.


Once we generated the extended level of logging clearly demonstrated that it was actually MSBuild’s native resolution mechanism that was resolving the reference to a more recent version of DLLs. The solution thus was simple and constituted simply editing our .csproj files and specifying SpecificVersion property to be true for these referenced binaries.

SpecificVersion property set on the references


Once we confirmed this, it was very easy to simply edit the C# project files and pass in True for the SpecificVersion tag for the assemblies in question. Needless to say the builds worked like a charm from that point onwards.

It also ensured that the MSBuild pipeline would only ever use the exact version of our referenced assemblies thus alleviating that concern as well!

Using VS2012 while targeting.NET 4.0

I have come across a few discussions on the topic of using Visual Studio 2012 along side Visual Studio 2010 while targeting .NET 4.0 from both of these IDEs. While in principle there shouldn’t be a problem adopting this strategy, it is important to be aware of some practical issues that exist in the above scenario.

Basically .NET 4.5 is an in-place upgrade of .NET 4.0 and replaces 4.0. It is not a side by side install (like 1..1, 2.0 etc. were). These two don’t co-exist on a box. There are quite a few problems that come up while using VS 2012 for applications that target .NET 4.0 runtime. Depending upon the client OS and the framework selection you make in Visual Studio an application can display selective bugs to a few client desktops whereas running fine for the others. This leads to further troubles as if you are using VS 2012 to build applications that target 4.0, you will not see these bugs at the dev time and hence will not be able to patch/fix them. What makes it further troublesome is that some of the most prominent problems appear on WPF space and while the stress these days is on Web based apps a lot of traditional organisations such as investment banks have a very heavy thick client application population.

These links will highlight the issues I refer to

http://social.msdn.microsoft.com/Forums/en-US/wpf/thread/c05a8c02-de67-47a9-b4ed-fd8b622a7e4a/

http://www.west-wind.com/weblog/posts/2012/Mar/13/NET-45-is-an-inplace-replacement-for-NET-40

So my advice to all development teams to be aware of the nature of applications that they develop and their audience. If for example your applications predominantly consist of web based apps, redistributable components, WWF or WCF applications then you should be fine using Visual Studio 2012 to target .NET 4.0. Examine your individual development scenarios and then take a decision on whether to upgrade to VS 2012 for .NET 4.0 development or not.

Hosting Coded WFs in WorkflowServiceHost

This post is a very quick one. I have been talking to a few people at www.stackoverflow.com who are quite keen to see if we can get WFSH (WorkflowServiceHost) to host coded WFs as opposed to XAML WFs. Further a couple of people also wanted to see if there is a way to get WFSH to host a WF without a Send/Receive activity pair.

I am much too busy with office to do a complete elaborate post right now but I am uploading a sample code base which shows exactly how to achieve all this. Basically using this approach you can have a coded WF or a WF without Send/Receive activities and still get WFSH to host that WF. The approach is almost a hack but hey a developer’s gotta do what a developer’s gotta do! It basically revolves around defining a virtual end point for a WF (which is defined in a different assembly). When IIS gets a request for this service it uses the custom end point to create a new instance of the workflow and start executing it in the WFSH. You will also notice that I am using a Custom worfklow service host factory. Using a custom factory enables us to setup extensions and configure the host the way we want to.

There is one limitation though, we are exposing our WFs as WCF services which we really shouldn’t have to do. However you can easily switch to net.pipe addresses (post coming up soon on these) and limit the access to these WCF services from outside world. Besides since they are WCF services you can limit the authorization/authentication to however you want.

It might be a bit tricky to understand the code at one go so if you need more explanations leave me a message here and I will type out a short synopsis.

You can download the code here.

Contact Us