Customise Almo with Setting Screen

Almo is a simple and affordable Azure DevOps Service addin for effective collaboration and faster work. As a work item management tool, it helps software teams to save time by eliminating duplicate and repetitive tasks. 

Almo comes with a pre-defined set of rules and configurations to simplify work item management. Further, you can use the Setting Screen to customise configuration options.

How to Open Setting Screen in Almo

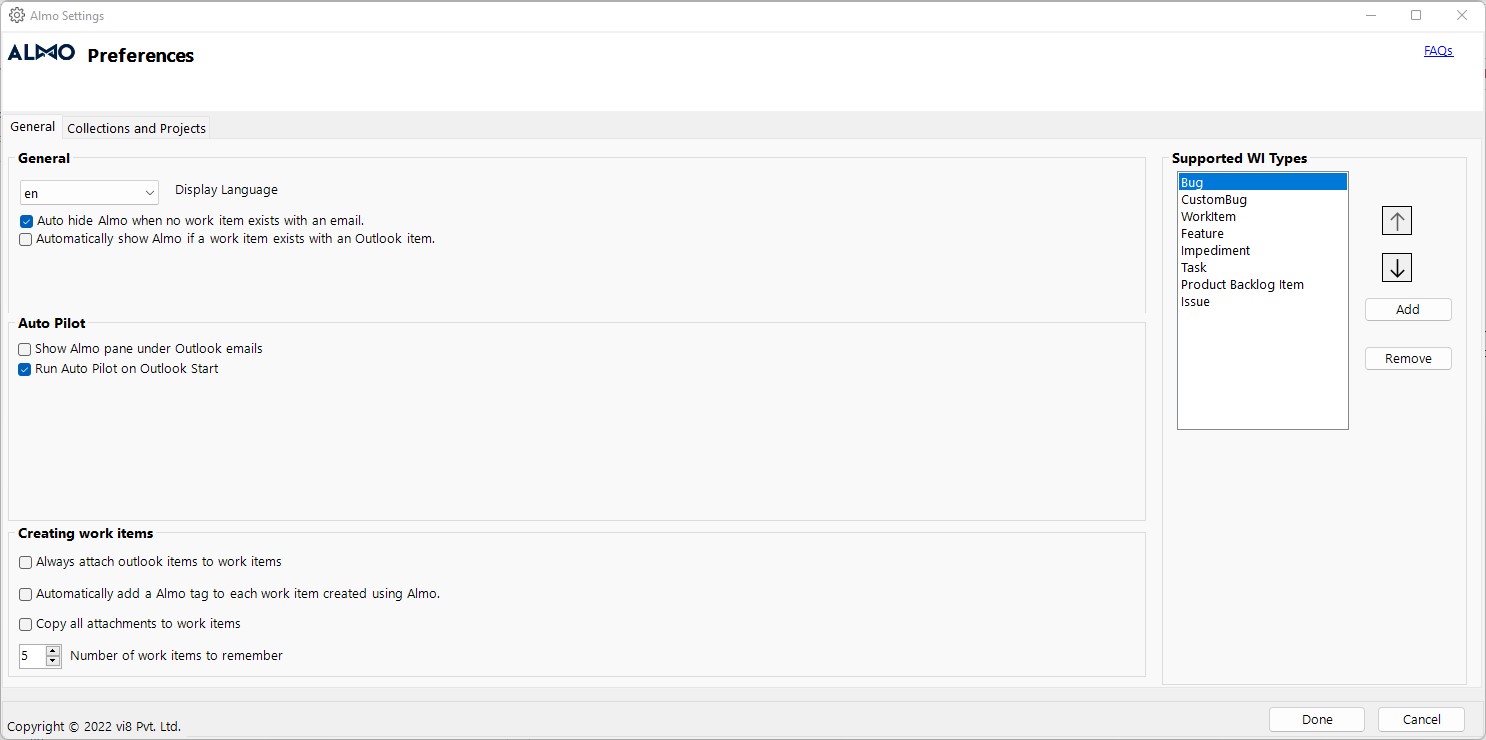
Go to the Almo menu and click ‘Almo Settings.’ This will open the settings window that you can use to set your Almo preferences. You will see two options in the main bar — General and Azure DevOps Server and Projects. Both are explained below.

General

Shows the General tab of Almo's settings screen. Here you can customize the behaviour of Almo such as adding or removing custom work item types
General tab of Almo’s settings screen.

1. General 

Use the ‘Display Language’ dropdown menu to select a convenient language. Currently, Almo is available in English, Russian, French and Deutsche.

Next, you will see two checkboxes that you can use to guide Almo’s behaviour towards emails with work items. 

  • Auto hide Almo when no work item exists with an email – if you check this checkbox and move to an email with no associated work item, the main Almo window will automatically hide.
  • Automatically show Almo if a work item exists with an Outlook item – use this checkbox to automatically display Almo when a work item is attached to an Outlook item. 

2. Auto Pilot 

Auto Pilot is a powerful Almo capability that follows your set of pre-defined rules to automatically create new work items or link the email to an existing work item. In this section of the Setting Screen, you can enable the Auto Pilot engine to start automatically: 

  • Run Auto Pilot on Outlook start – Almo will run automatically when you start Outlook and process new emails that it missed since the last time Outlook was shut down.

3. Creating Work Items

Use this section to set preferences for work item management. There are three checkboxes in this section along with a number input box.

  • Always attach Outlook items to work items – Almo will automatically attach Outlook items to work items.
  • Automatically add an Almo tag to each work item created using Almo – All the work items that Almo creates will automatically include a special Almo tag for easy identification.
  • Copy all attachments to work items – all attachments included in your Outlook email will be copied to the work item.
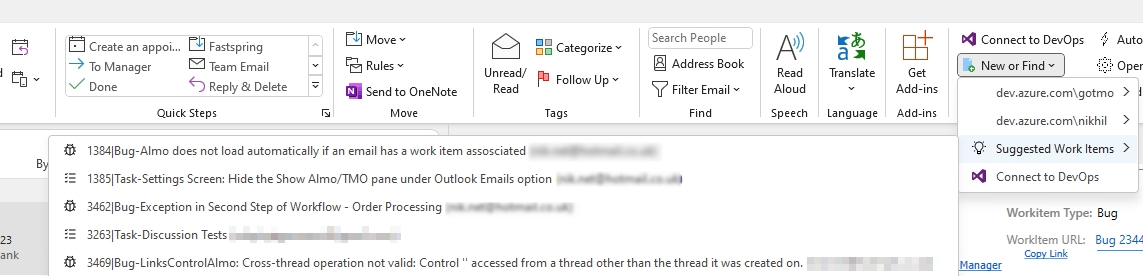
  • Number of work items to remember – control the number of work items you see as suggestions in the Suggested Work Items menu in the main Almo menu.

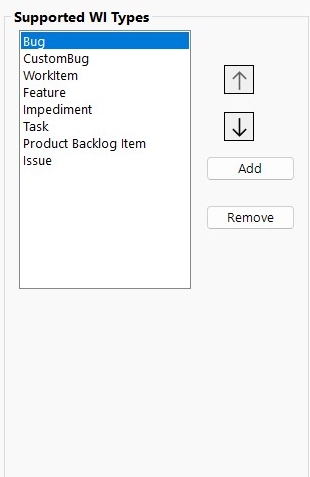
4. Supported WI Types

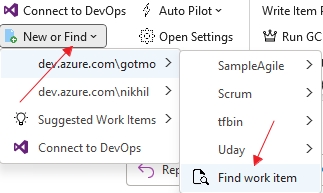
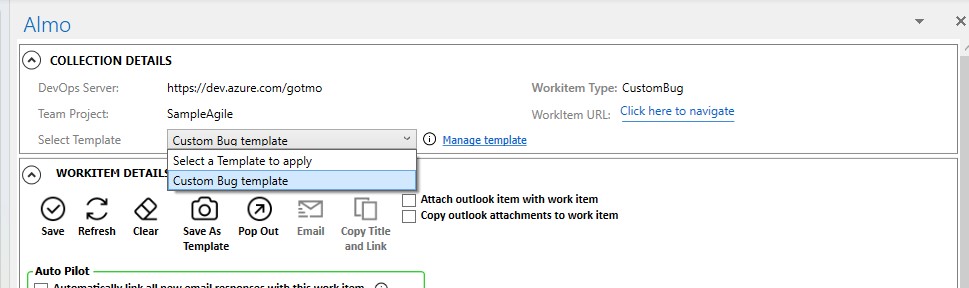
In this section, add any work item type that is unique to your Azure DevOps project or remove the one that you wouldn’t work with. Adding/Removing entries from here controls what you will see when you click the New or Find menu in Almo’s toolbar in Outlook’s ribbon.

Add or remove work item types from Almo's menu options using this section
Control what work item types appear in Almo

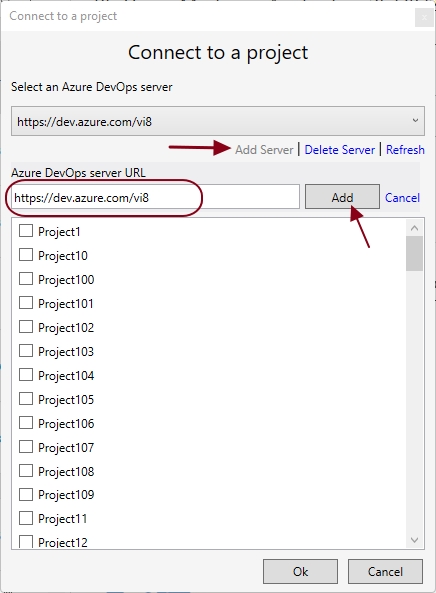
Azure DevOps Servers and Projects

Shows the Azure DevOps and Projects tab of Almo's settings screen. Here you can instruct Almo to connect with particular Azure DevOps Organisation and projects on startup
Azure DevOps and Projects tab of Almo’s Settings screen

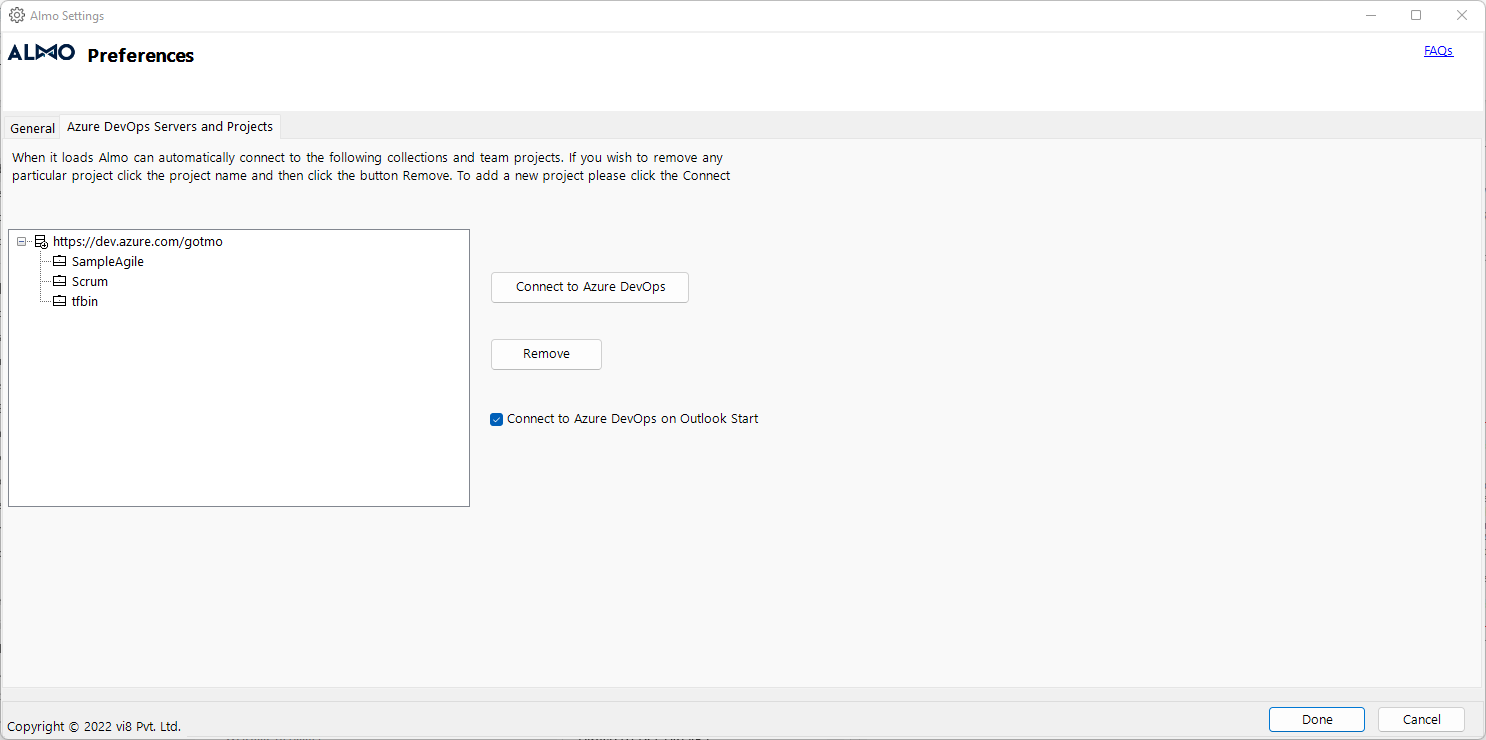
This section enables Almo to connect to Azure DevOps Servers. Check the ‘Connect to Azure DevOps on Outlook Start’ checkbox to run this feature. 

When it loads, it lets Almo automatically connect to your existing collections and team projects. To remove any project, select the project name and then click the ‘Remove’ button. Click the ‘Connect to Azure DevOps Service’ button to add a new project.

Find Existing Work Items in Azure DevOps Service with Almo

As a Microsoft Outlook plugin, Almo does more than create new work items. It simplifies your work by making it easier to find existing work items in Azure DevOps Service. You can use these existing work items with Outlook emails, calendar appointments or tasks.

Find Work Item Using Id or Title

Begin by selecting the email you want to work with and then go to the ALMO toolbar. Select the ‘New or Find’ from Almo’s menu and click ‘Find work item.’

Use Almo's New or Find menu, then the project then
Find work item menu option

A dialogue box will open where you can enter the work item Id or a part of its title in the space opposite ‘Search By Id or Title.’ Click ‘Enter’ or the ‘Find’ button to find the required work item. Almo will show you a list of all the work items with the same Id or title. You can select the work item you want to work with and click ‘Ok.’ Almo will automatically open the details of that work item in Microsoft Outlook.

In Almo use work item id or a part of their title to search for existing work items in Azure DevOps
List of existing work items in Almo

Now, to link the work item to your email without modifying it, click on ‘Save’ under ‘WORK ITEM DETAILS.’

Click Save in Almo main work item form to link the work item with this email or outlook item.
Main work item form in Almo and Outlook

Once the work item is linked, the ‘View and Unlink’ option in the Almo toolbar will become active. Click it and a dropdown menu with the recently saved work item will appear. You can follow the same steps to load it again.

Find Work Items Linked to Conversations

Select the ‘New or Find’ from the Almo toolbar. Next, choose ‘Suggested Work Items’ to see the work items that you have either recently created or worked with using Almo and Microsoft Outlook. This list can also contain work items linked to the emails in your selected conversation (list of threaded emails). In addition, if other work items are linked to any of those emails, Almo will find them and add them under ‘Suggested Work Items.’

Almo can suggest work items by parsing emails and remembering the latest work items that you have created
Suggested work item list in Almo

Connect to More Work Items


Pro Tip: You can also connect to more projects by clicking on ‘Connect to New Projects.’


A dialogue box will open where you can add your server. Click ‘Add’ and Almo will show you a list of projects. Select the one you want to work with by clicking on the check box and then click ‘Add’ at the bottom of the dialogue box.

Finding work items can be a strenuous task when done manually. Scouring through emails is a time-consuming process. With Almo, you can find all the related work items in just a few clicks. Try it today and save precious hours every day.

Quick Start Guide to Almo

Almo is a single Microsoft Outlook addin that connects with Azure DevOps and helps in easy work item creation and management. It automates repetitive tasks and enables you to reduce manual labour by 15%.

Ready for a more efficient way of working? Download Almo and start using it in just three steps:

Add Work Item Types to Almo Settings

To create a work item, go to the Almo toolbar and select ‘Open Settings.’ A dialogue box will open with a list of work item types you can work with. You can also add new work item types by clicking ‘Add’ and/or delete the existing ones by selecting the ‘Remove’ option. 

This screen shows various settings in Almo that a user can set. A user can specify what work item types they want to work with on this screen.
Almo’s Settings screen with various options to customize Almo’s operations.

Connect to an Azure DevOps Server

Click “Connect to DevOps” button in the Almo menu. 

Click the connect to devops button to connect to an Azure DevOps Service organisation
Connect to DevOps enables connection to Azure DevOps


In the next screen, click “Add Server”, enter the server URL and press ‘Add.’ Once the authentication is complete, Almo will display a list of alphabetically-sorted projects. Check the project(s) you want to work with and click ‘Ok.’

Use the Almo's Add New Server Window to add the Azure DevOps Organisation you want to connect to then select the projects you want to work with
Connect to Azure DevOps Organisation and projects

Create and Save a Work Item

Click on the email that you want to associate with a work item and then select the ‘New or Find’ option from the Almo toolbar. This will open a dropdown menu containing the work item type. You can also select existing work items.

Use the New or Find menu to create a new work item type from Outlook using Almo.
Select a project and work item type using New of Find menu

Select the work item type and Almo will pick up important information from the email and pre-populate fields in the work item type.

The main work item form shows all the Azure Devops fields you can populate using Almo and Outlook
Main work item form renders in Outlook

Pro tip: you can modify this behaviour by using Templates.


Finally, click ‘Save’ and Almo will create the work item. 

Almo will automatically attach a copy of the email and other related attachments to the work item it creates. You can load the work item again in Microsoft Outlook and track all the updates.

Templates Remove Manual Data Entry in Work Item Fields

Templates take away the manual entry of work item fields when you create them. Consider them as the blueprints that automatically populate fields in work items from a group of default values you set when you create a Template. 

With Templates, Almo can also automatically extract the correct information from Outlook objects, add that to the work item fields automatically and thus save hours of manual work. You do this by using Expressions in Templates which then instruct Almo to extract data from Outlook objects (email, calendar meetings or tasks) and use those values to fill the work item fields.

Video Walk Through

Here is a video walk through of creating and using Templates:

Creating Template Using Template Manager

Go to the Almo menu and open the ‘Template Manager’ at the top-left corner of your screen. Before creating a Template, Almo will prompt you to connect to a server if you have not done that yet. 

Click Template Manager button in Almo's menu to open the Template manager
Template manager button opens template manager

In the Template Manager dialogue box, select ‘Add New Template’ to access the dropdown menu and then select a project and a work item type for which you are creating this Template. This will open the Template editor that you can use to set your Template rules. 

Click Add New Template button to start creating a new template
Add new template button starts new template

Pro Tip: You can create multiple Templates for each work item type.


Adding details to the Template editor

The screenshot below shows how the blank template editor might appear. Since the Template Editor uses your Azure DevOps Service’s setup to render the work item form, your view of tempalte editor might appear different than the view shown here. However the basic sections in “Template Details” will be the same.

Template editor enables you to specify default values of work item fields including the ability to extract values from Outlook objects
A generic view of the template editor

1. Template Details

Begin by adding Template details like name and description. You will also see a few checkboxes with different functions in the editor. Select one or more per your preference. Here is what they do:

Checkbox 1: Set As Default — Almo will automatically use these Template details whenever you create the specified work item type.

Checkbox 2: Copy Outlook attachments to work item — Almo will take any attachments that are present in the Outlook email and attach them to the work item when it is created

Checkbox 3: Attach Outlook item with work item — Almo will automatically attach a copy of your Outlook email with the work item when it is created.

2. Expressions

Use Expressions to take various properties of an Outlook object like email, calendar or task to populate multiple fields in the work items. These properties could be email subjects, time stamps, receivers’ addresses and more. 

Expressions Description
[TOEMAIL] Almo will replace this with recipient’s email address in the Outlook email.
[TONAME] Almo will replace this with recipient’s name in the Outlook email.
[BODY] Almo will replace this with the body or text of the Outlook email.
[FROMEMAIL] Almo will replace this with sender’s email address in the Outlook email.
[FROMNAME] Almo will replace this with sender’s name in the Outlook email.
[SUBJECT] Almo will replace this with the subject of the Outlook email.
[SENTDATE] Almo will replace this with the sent date of the Outlook email.
[NOW] Almo will replace this with the current date as per your computer’s calendar.
[RECEIVEDDATE] Almo will replace this with the received date of the Outlook email.


Select an Expression from the list and assign one or more fields in the Template (further explained in the next step). 

3. Template Fields

The fields in the template are rendered as they would appear in the work item on Azure DevOps Service. Almo will paint this section as per the setup of your work item type and thus it might look different than the generic screenshot below.

Use this section to add further details to the Template you want to create. For example, use the ‘Subject’ box for the title of the work item. You can also select an Expression to populate the fields, such as the [Subject] of the email. For this, double-click the Expression and paste it into one of the Template fields.

Once you have set all the rules for the work item type, scroll down and click ‘Save.’

Creating Template While Creating Work Items

One of the easiest and quickest ways of creating a Template is while creating a new work item. First, follow the usual steps for creating a new work item:

Click the ‘New or Find’ option in the Almo toolbar > select the work item type

To save Template rules, instead of clicking ‘Save,’ click ‘Save As Template.’ This will open the Template editor where you can fill in additional details and save this Template. 

More on Almo Templates

Setting a Template as Default

For convenience, you can set a Template as default. This will instruct Almo to automatically use the default Template to pre-fill the values every time you create a new work item of that type. 

Filter Templates

If you have more than one template for the same work item type, you can use the combo box to choose the right one
Select the right template you’d like to use

If you have more than one Template for a work item type, use the ‘Select Template’ option to filter the Templates. 

Managing Templates

Use the Template Manager to manage your Templates, including adding new Templates, setting an existing Template as the Default Template and deleting Templates.

You can access the Template Manager from the Almo toolbar.

Feedback on Almo

Every product is a work-in-progress and Almo is no exception. We aim to make Almo the most efficient work item management solution that saves your precious working hours daily. We welcome all product feedback at [email protected].

If you come across a bug or want to give your input while using Almo, click the Feedback button built into the product.

Button that users can click to submit feedback on Almo, the most affordable work item management tool
Click this button to give feedback on Almo

We actively read and consider every feedback though we might not be able to respond to each piece of feedback individually. We look forward to making Almo your go-to Azure DevOps Service work item management tool!

Contact Us